Node.js, known for its non-blocking, event-driven architecture, is particularly well-suited for handling asynchronous requests. This capability makes it an excellent choice for building scalable backend applications that need to process multiple simultaneous requests efficiently. In this guide, we’ll explore how to handle asynchronous requests with Node.js using various tools and techniques.
Understanding Asynchronous Requests in Node.js
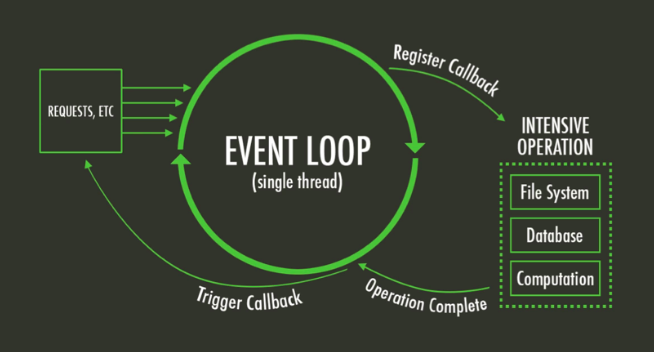
In Node.js, asynchronous operations allow the program to perform other tasks while waiting for time-consuming operations (like database queries or API calls) to complete. This is achieved through mechanisms like callbacks, promises, and async/await.
Techniques for Handling Asynchronous Requests
1. Callbacks
A callback is a function passed as an argument to another function. It gets executed after the completion of an asynchronous operation.
Example:
const fs = require('fs');

fs.readFile('example.txt', 'utf8', (err, data) => {
    if (err) {
        console.error(err);
        return;
    }
    console.log(data);
});
Pros:
- Simple to use for basic tasks.
Cons:
- Can lead to callback hell if nested deeply.
2. Promises
Promises provide a cleaner way to handle asynchronous operations by avoiding deeply nested callbacks.
Example:
const fs = require('fs').promises;

fs.readFile('example.txt', 'utf8')
    .then(data => console.log(data))
    .catch(err => console.error(err));
Key Methods:
then(): For handling resolved values.catch(): For handling errors.finally(): Executes code after promise is settled, regardless of outcome.
3. Async/Await
Async/await simplifies working with promises by allowing asynchronous code to be written in a synchronous-like manner.
Example:
const fs = require('fs').promises;

async function readFileAsync() {
    try {
        const data = await fs.readFile('example.txt', 'utf8');
        console.log(data);
    } catch (err) {
        console.error(err);
    }
}

readFileAsync();
Advantages:
- Improved readability.
- Easier debugging.
Using Middleware for Asynchronous Requests
In Node.js frameworks like Express, middleware functions are often used to handle asynchronous operations.
Example:
const express = require('express');
const app = express();

app.get('/data', async (req, res) => {
    try {
        const data = await fetchDataFromDatabase();
        res.json(data);
    } catch (err) {
        res.status(500).send('Server Error');
    }
});

function fetchDataFromDatabase() {
    return new Promise((resolve) => {
        setTimeout(() => resolve({ message: 'Data fetched!' }), 1000);
    });
}

app.listen(3000, () => console.log('Server running on port 3000'));
Handling Multiple Asynchronous Requests
1. Promise.all
Promise.all runs multiple promises concurrently and waits for all of them to resolve.
Example:
const fetchData = () => new Promise(resolve => setTimeout(() => resolve('Data 1'), 1000));
const fetchMoreData = () => new Promise(resolve => setTimeout(() => resolve('Data 2'), 2000));

Promise.all([fetchData(), fetchMoreData()])
    .then(results => console.log(results)) // Output: ['Data 1', 'Data 2']
    .catch(err => console.error(err));
2. Promise.allSettled
Unlike Promise.all, it waits for all promises to settle (either resolved or rejected) and provides the status of each.
Example:
Promise.allSettled([fetchData(), fetchMoreData()])
    .then(results => console.log(results));
Debugging Asynchronous Code
- Use Logging: Add
console.logstatements to track the flow of your code. - Async Hooks: Use Node.js’s built-in
async_hooksmodule for tracing asynchronous operations. - Debugging Tools: Utilize debugging tools like Chrome DevTools or VS Code’s built-in debugger.
Common Pitfalls and How to Avoid Them
- Uncaught Exceptions: Always handle promise rejections using
.catch()ortry-catchblocks. - Blocking the Event Loop: Avoid long-running synchronous operations.
- Memory Leaks: Monitor resource usage and close unused connections or files.
Conclusion
Mastering asynchronous requests in Node.js is crucial for building efficient and scalable backend applications. By leveraging callbacks, promises, and async/await, developers can handle complex workflows with ease. Experiment with these techniques to find the best approach for your application, and remember to follow best practices for error handling and debugging.